Converting addresses to latitude and longitude in Tableau Prep using Python
As announced at Tableau Conference’20, Tableau Prep Builder is getting extended spatial support in new releases throughout 2021. Users will be able to connect to spatial data, perform spatial joins, and use spatial calculations such as MAKEPOINT or MAKELINE. To use these spatial calculations your data set should include fields with latitude and longitude values. Sometimes these values are already present in a data set, but sometimes the location data comes only in the form of an address or postcode. In the latter case addresses should be geocoded, i.e. converted into latitude and longitude values that can be used in spatial calculations and visualisations later.
At the time of writing (April 2021), it’s not possible to geocode your data directly in Tableau Prep Builder. However, it can be done by adding a Script step to your workflow, and using a Python or R script. In this post I’ll show how to convert a list of UK postcodes for London fire stations into latitude and longitude in a Tableau Prep flow using the Postcodes.io API. While this API is focused on the UK only, there are other APIs covering the whole world, but they are frequently paid and require authentication to use. You can see a list of frequently used geo APIs at the end of this post.
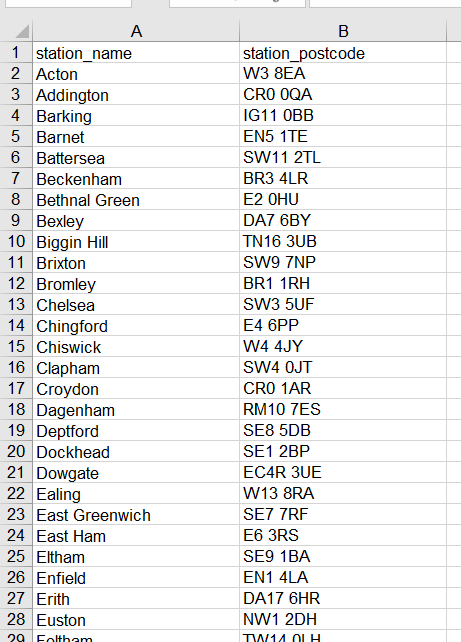
Data set with postcodes of London fire stations
I presented this topic at the Tableau Prep Virtual User Group in December 2020. Here are the webinar’s slides and its recording. You can also refer to my earlier post on connecting to APIs in Tableau Prep Builder for an API refresher.
The overall process can be divided into five steps:
- Read the API’s documentation
- Write a Python script with the logic of the request
- Install and launch TabPy server
- Connect Tableau Prep Builder to the TabPy server
- Add the Script step in your Tableau Prep flow to convert postcodes into latitude and longitude
Step 1. Read the API’s documentation
The Postcodes.io API has detailed documentation on their website outlining how to structure a request and what data you will get in the response. You can use this free API to geocode one or a list of postcodes across the UK. You can also use it to reverse geocode latitude and longitude, i.e. convert these values into a physical address, or validate postcodes in your data set.
In the example discussed in this post, we are interested in geocoding a list of postcodes from our data set. That can be done by sending the following POST request to the API, which includes a list of the postcodes that we need to convert. Notice that the list of our postcodes should be formatted as a JSON string:
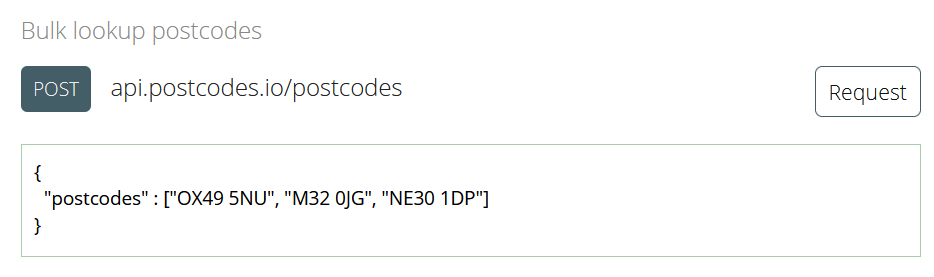
Extract from the API's documentation.
Now that we understand how the data should be formatted, we can start building the request. Since we will use the list of postcodes from the data that is already in our Tableau Prep flow, we will construct our request URL dynamically, directly in the Python code. In other words, we will define the structure of the URL in the script, but the actual postcode values will be dynamically added to it, depending on the data in our Tableau Prep flow.
Step 2. Write a Python script with the logic of the request
First, we import three Python libraries:
- Requests to establish an HTTP connection to the API
- Pandas to work with tabular data
- JSON to convert our data to and from JSON format
import requests
import json
import pandas as pd
Next, we need to define the base URL, the endpoint of our request, and define the request headers.
#set the base URL and the endpoint
api_url_base = 'http://api.postcodes.io'
postcode_lookup_endpoint = 'postcodes/'

# build and format endpoint URL
postcode_lookup_url = '{0}/{1}'.format(api_url_base, postcode_lookup_endpoint)

# define request headers
headers = {'Content-Type': 'application/json'}
After we defined the request’s format, we need to write a function that will hold the logic of our request:
- take the list of postcodes from the dataset (in this case it’s contained in the field station_postcode),
- convert it into a Python list object,
- serialise the list into JSON format,
- feed the array of postcodes in JSON format into our request URL.
In this example, the function is called bulk_geocode_by_postcode, and it takes the data set from the Input step in our Tableau Prep flow as a Pandas dataframe (df).
def bulk_geocode_by_postcode(df):

# bring in the column with postcodes from the Input data set
# "station_postcode" is the name of the field in my data set that holds postcodes

    postcodes = df["station_postcode"].tolist()

    print('Original list of postcodes:')
    print(postcodes)
    print('=-'*40)

    # build the request's body from the list of postcodes

    body = json.dumps({"postcodes": postcodes})

    print('Request with the list of postcodes:')
    print(body)
    print('=-'*40)
Here is how the list of postcodes looks like at this stage when we run the code:

Click on the image to open the full-sized version.
Now that we have the body of the request in the required format, we can send our POST request to the API using the requests library that we imported earlier.
# make an API call using endpoint URL for postcodes lookup.
# Provides headers and request body

response = requests.post(postcode_lookup_url,headers=headers, data=body)

# If the request is successful, parse it and extract longitude
# and latitude for each postcode from the response
# else return None

if response.status_code == 200:
    parsed_response = json.loads(response.content.decode('utf-8'))
    results = parsed_response['result']

    print('Response from the API:')
    print(results)
    print('=-'*40)
If our request is successful (i.e., we get the 200 code back), the script will return a number of details for each postcode in JSON format, including the country, region, eastings, northings, parliamentary constituency, parish, and, of course, latitude and longitude.
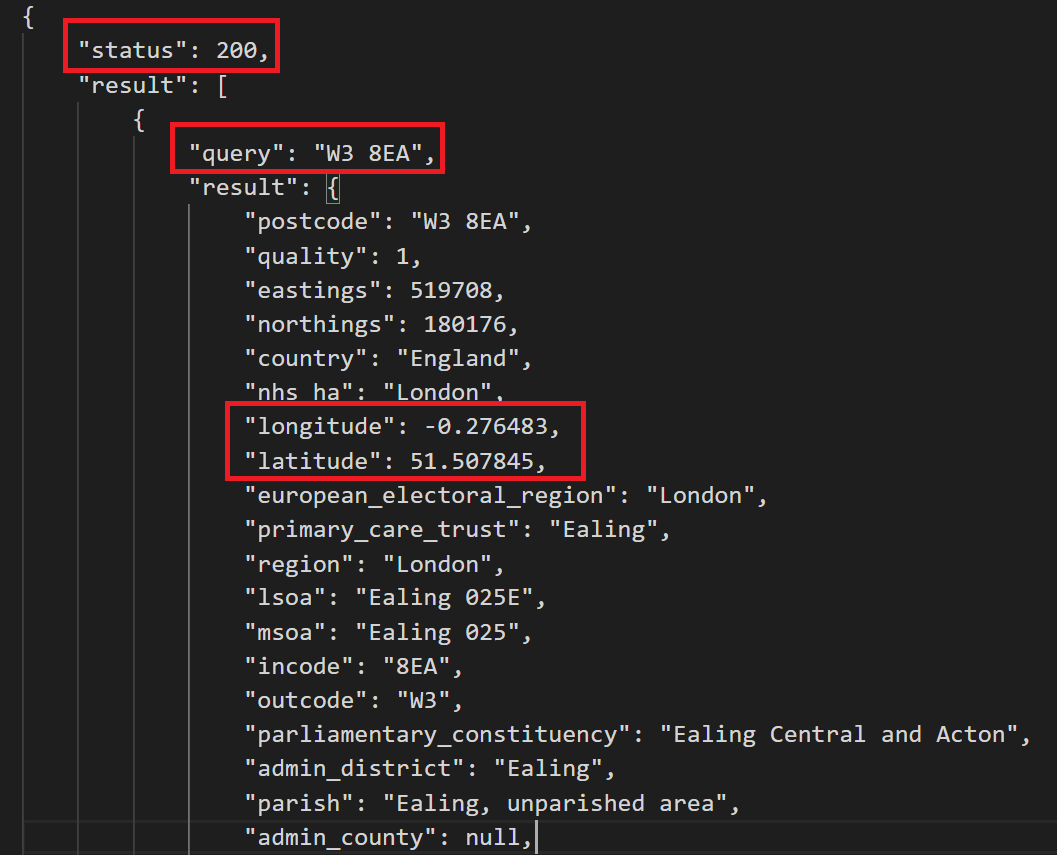
Snippet of the response from the API
The last thing we need to do here is to keep only latitude and longitude values from the response, and convert this list into a Pandas dataframe, i.e. a table that Tableau Prep understands.
geocodes = []
for result in results:
    query = result['query']
    longitude = result['result']['longitude']
    latitude = result['result']['latitude']
    geocodes.append({'postcode': query, 'longitude': longitude, 'latitude': latitude})

print('The list of postcodes and lat/lon values extracted from the API response:')
print(geocodes)
print('=-'*40)

df = pd.DataFrame(geocodes)

print('Dataframe with the response:')
print(df)
print('=-'*40)

return df
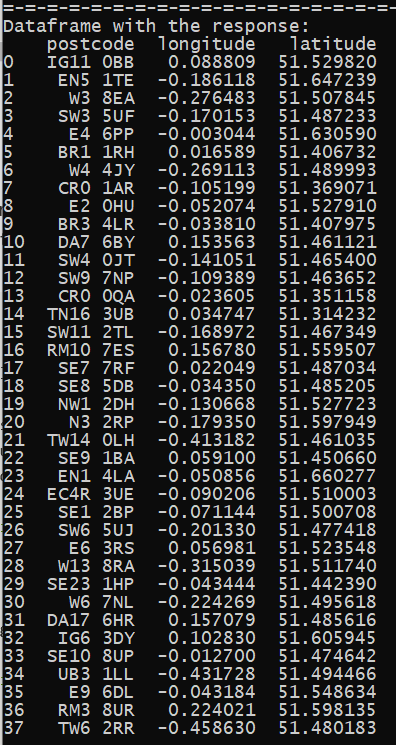
Response from the API converted to a Pandas dataframe.
Before returning the final table from this function, we need to define the structure of the output from the Python script and set the data types for every column to make sure that Tableau Prep interprets the data correctly. To do so we need to include the get_output_schema function to your Python script. You can see the full list of available data types and how to specify them in this function on the Tableau Help website.
def get_output_schema():
    return pd.DataFrame({
        'postcode' : prep_string(),
        'longitude' : prep_decimal(),
        'latitude' : prep_decimal()
    })
Step 3. Install and launch TabPy server
Before we can use our Python script in the Tableau Prep flow, we need to install and launch TabPy, or the Tableau Python Server. It is a framework that allows Tableau to execute Python code. For this project, I installed and run TabPy on my local computer, but you can also install it on its own server, so it is always available to run scripts. You can learn how to install TabPy in my previous post.
Once TabPy is up and running, you will see this message: ‘Web service listening on port 9004’. This is the default port for TabPy, and we will need it to establish the connection between TabPy and Tableau Prep Builder in the next step.
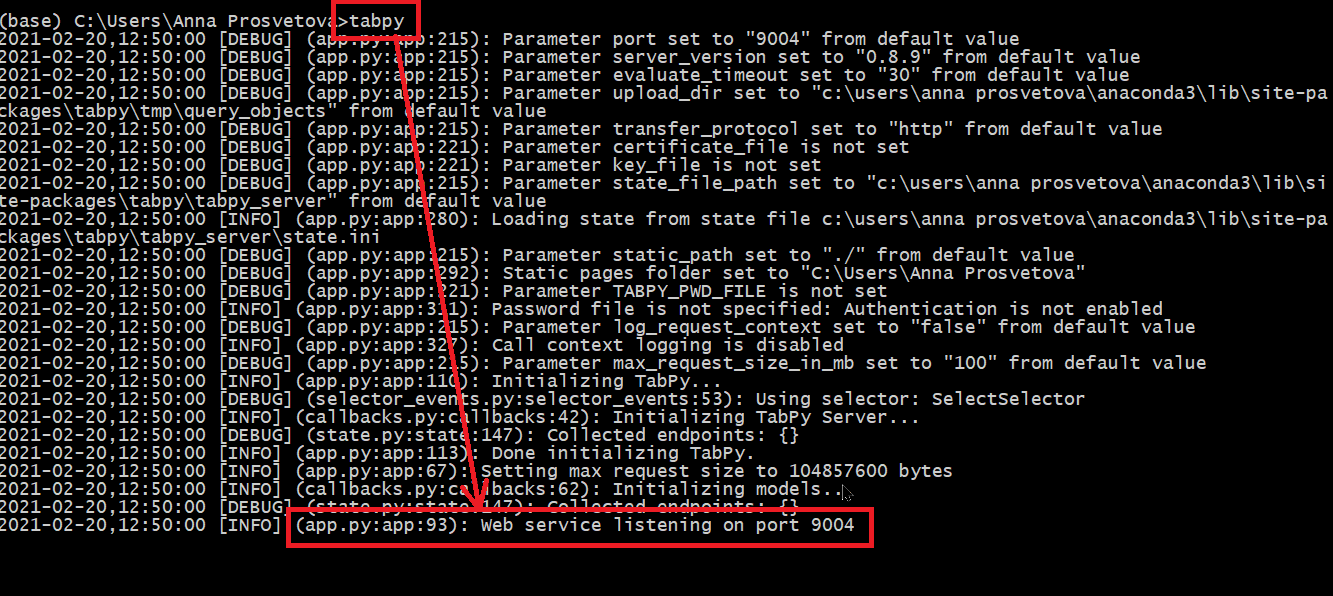
Click on the image to open the full-sized version.
Step 4. Connect Tableau Prep Builder to the TabPy server
After TabPy is launched, we can connect Tableau Prep Builder to it and run Python scripts in our flows. Here is how to do it:
- In Tableau Prep Builder, select Help > Settings and Performance > Manage Analytics Extension Connection from the top menu.
- In the Select an Analytics Extension drop-down list, select the Tableau Python (TabPy) Server option, and enter the server’s name and credentials, if required.
- As I run TabPy on my local machine, I put ‘localhost’ as my server, and no username or password.
- Make sure to include the correct port in this dialogue (port 9004 is the default port for TabPy as we saw in the previous step).
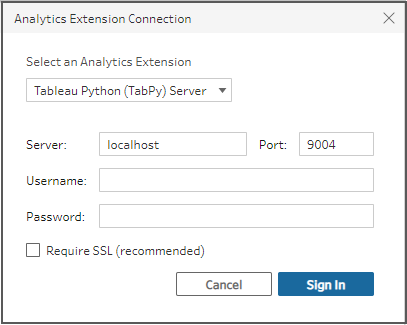
Connecting to TabPy server in Tableau Prep Builder
Step 5. Add the Script step in your Tableau Prep flow to convert postcodes into latitude and longitude
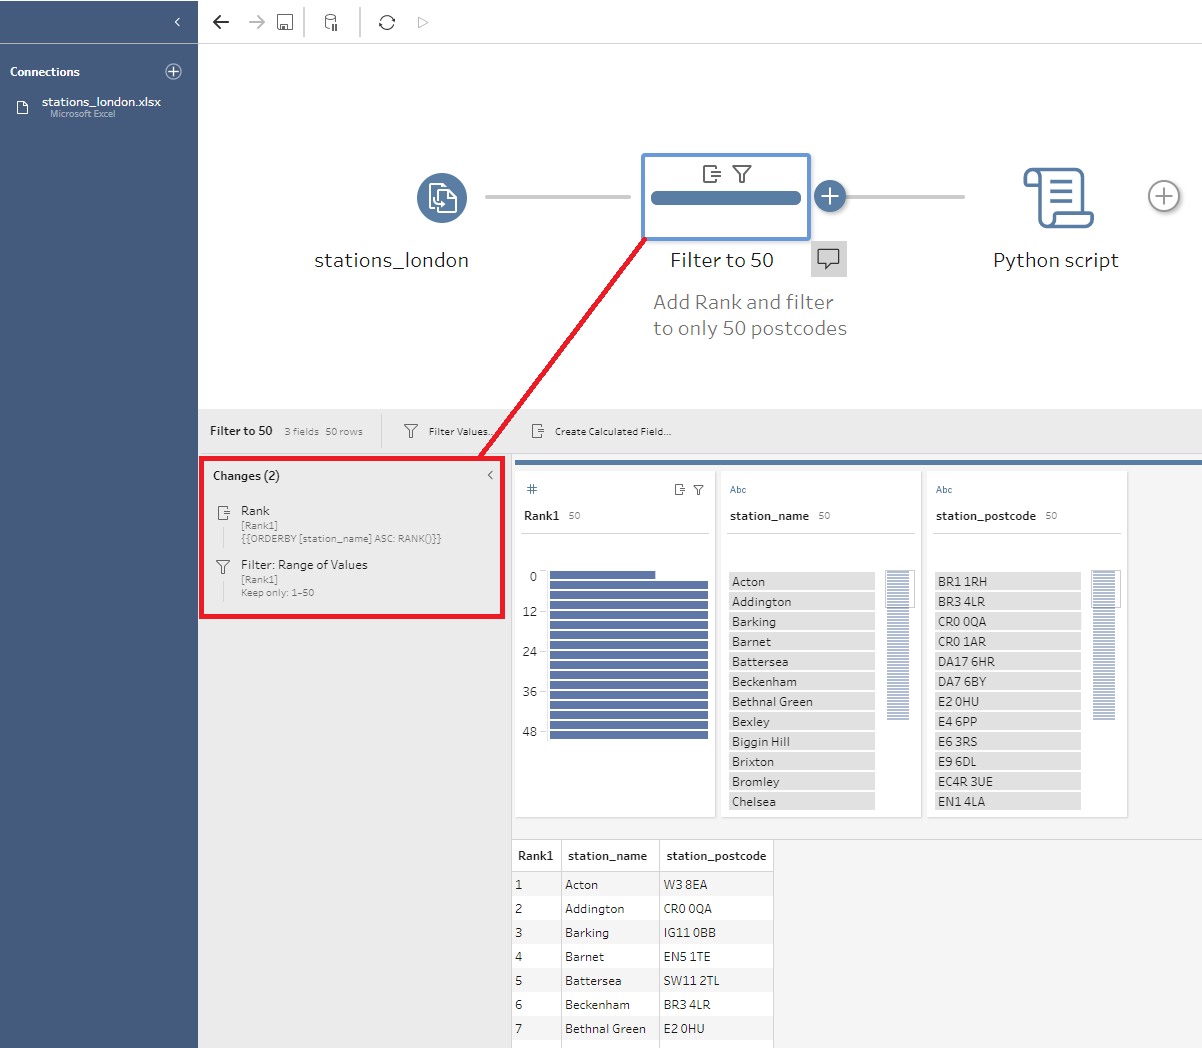
Now we can add the script to our Tableau Prep flow using the Script step. The flow for this example consists of only the Input step with the stations_locations.xlsx Excel file and a Clean step. While working with this API, I realised that the maximum number of postcodes it can convert in one go should be up to 50 (even though on the website it says it can be up to 100). So, I added the Rank field to my table and filtered the list to the first 50 postcodes.
When we add a Script step after the Clean step, we should configure it as follows:
- Connection type should be set to Tableau Python (TabPy) Server
- In the File name option click the Browse button, and select the Python script you will use.
- Include the name of the function from the Python script in the Function Name option. In our case, it should be bulk_geocode_by_postcode. Note that we just specify the name of the function here rather than calling it with end parentheses.
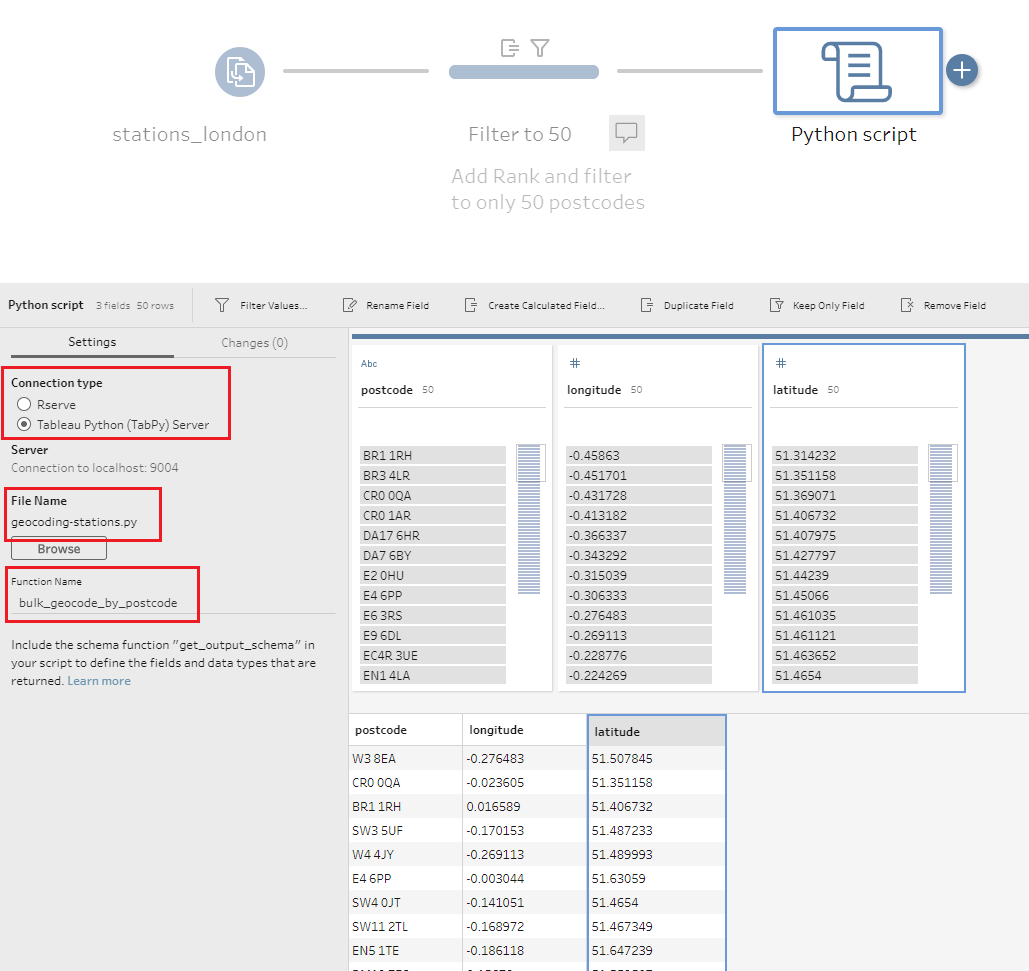
Once you have entered these details, the script will run automatically. You should now have a table with latitude and longitude values for each postcode which can be used further in the flow. Let me know if you have any questions.
You can find my final code and the Tableau Prep flow for this project in this GitHub repository .
Other APIs and Python libraries for geocoding
- Google Maps API (using the Geolocation Python library)
- Open Cage API
- Various geocoding services, including OpenStreet Map (using geopy Python library)
Useful Links
- Connecting to APIs in Tableau Prep Builder using Python
- How to use an API with Python (Beginner’s Guide)
- Using Python scripts in Tableau Prep flow
- TabPy documentation on GitHub
- List of public APIs for practising
- Using TabPy with Tableau Prep Conductor
Illustration by Freepik Stories