New feature in Tableau Prep Builder 2020.1: Fixed Level of Detail expressions
Tableau Prep Builder 2020.1 was recently released, and it now supports Fixed Level of Detail (Fixed LOD) calculations, similar to Tableau Desktop. That means that you can use them to change the granularity of fields in your data, or create new fields using the existing data in your dataset. Doing such calculations before bringing the data into Tableau Desktop will improve a dashboard’s performance, especially when working with large datasets.
In this blog post I will discuss how to create and edit Fixed LOD calculations in Tableau Prep Builder as well as current limitations of this feature.
What are LOD expressions?
Level of Detail (LOD) expressions became available in Tableau Desktop 9.0 back in 2015. LOD expressions allow you to aggregate the data at different levels or by different dimensions in the dataset, and use it in further calculations. For example, if your current dataset shows sales on a daily level, you can aggregate it by month or customer using Fixed LOD expressions.
There are three types of LOD expressions available in Tableau Desktop: FIXED, EXCLUDE, and INCLUDE. However, Tableau Prep Builder only has the FIXED type at the moment. This LOD type allows you to aggregate your data independently of the dimensions used in the view. I recommend reading this Tableau whitepaper on understanding Level of Detail expressions to get a better idea of how these calculations work, and learn about some use cases.
Replicating Fixed LODs in previous versions of Tableau Prep Builder
In previous versions in Tableau Prep Builder, it was possible to replicate the functionality of the Fixed LOD by using the Aggregate and Join steps. Let’s look at how I used this technique to solve Preppin’ Data’s 2020 Week 1 challenge. We will solve this challenge below using Fixed LODs. Feel free to skip to the next section if you are familiar with this approach.
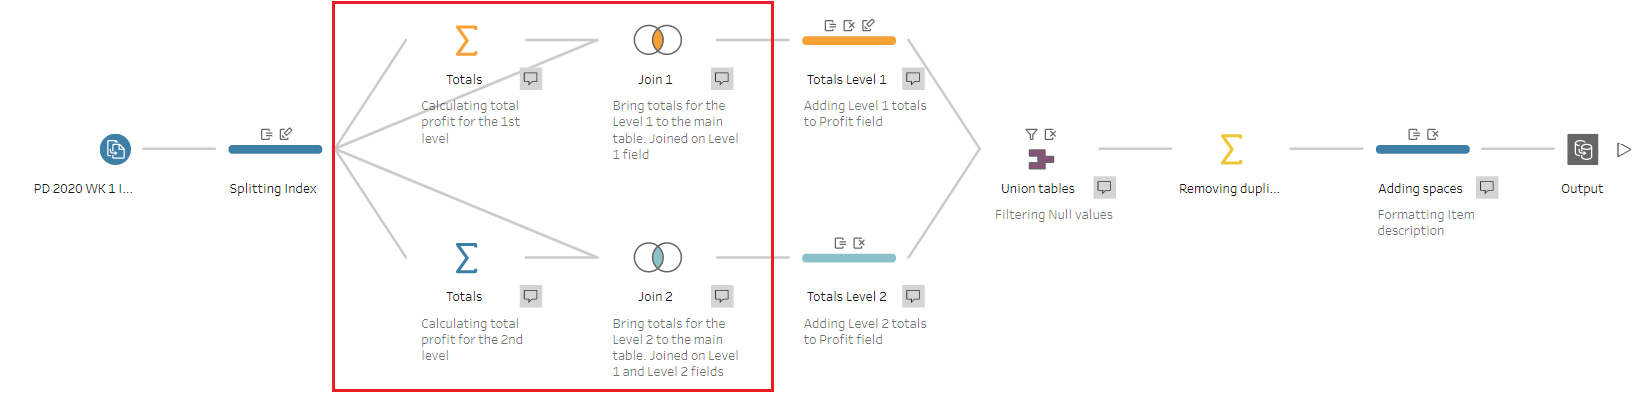
The area highlighted in red is a replication of Fixed LOD expression in a previous version of Tableau Prep Builder
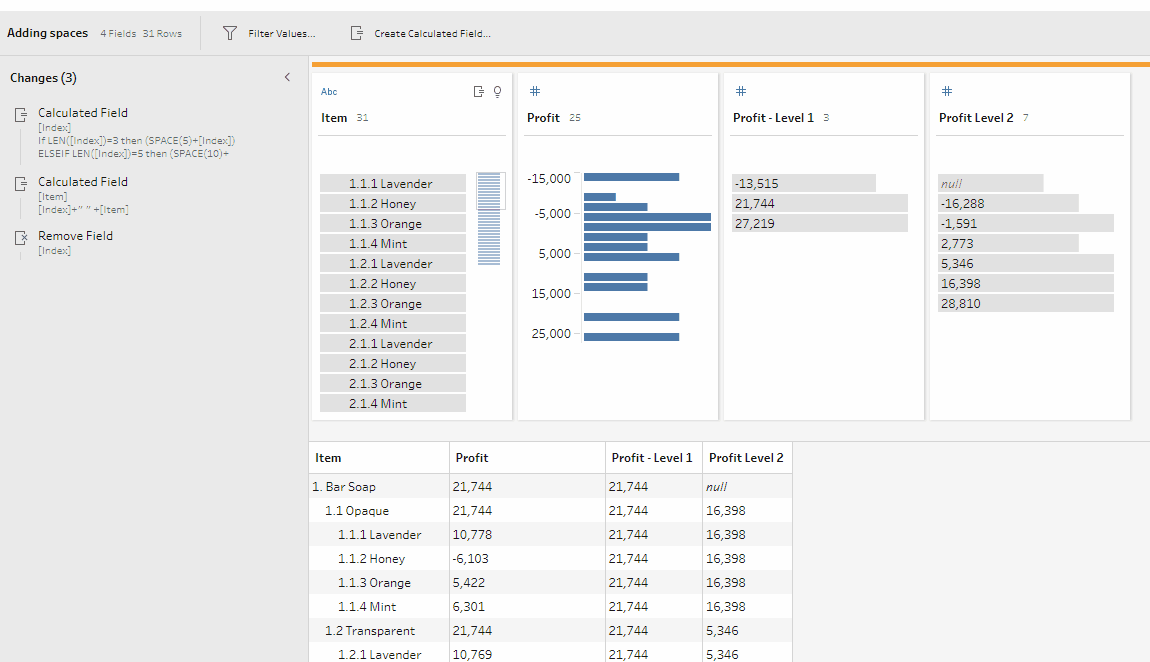
In this challenge, we needed to calculate total profits for different levels of the profit statement’s hierarchy: for Level 1 and Level 2. To do so, I added two branches from the Cleaning step for two separate Aggregate steps: one for calculating the profit for Level 1 products, and another for the profit for Level 2 products.
For Level 1
For Level 2
After calculating total profits for Levels 1 and 2, I brought them back to the main dataset by joining each Aggregate step back to the earlier Cleaning step, i.e. the main dataset.

For Level 1

For Level 2
As you can see, it’s not a complex process in general, but it requires 4 additional steps in the workflow. Now, let’s see how we can create a Fixed LOD calculation in Tableau Prep Builder 2020.1 with just one step.
Creating Fixed LOD calculations in Tableau Prep Builder 2020.1
In the flow for Week 1’s challenge, let’s add a new Cleaning step after the Input and a first Cleaning step that splits the Index field. We will use this new Cleaning step to calculate profits for both Level 1 and Level 2 creating a Fixed LOD calculation. There are two ways to go about it.
1. Create a Fixed LOD calculation by writing a calculation
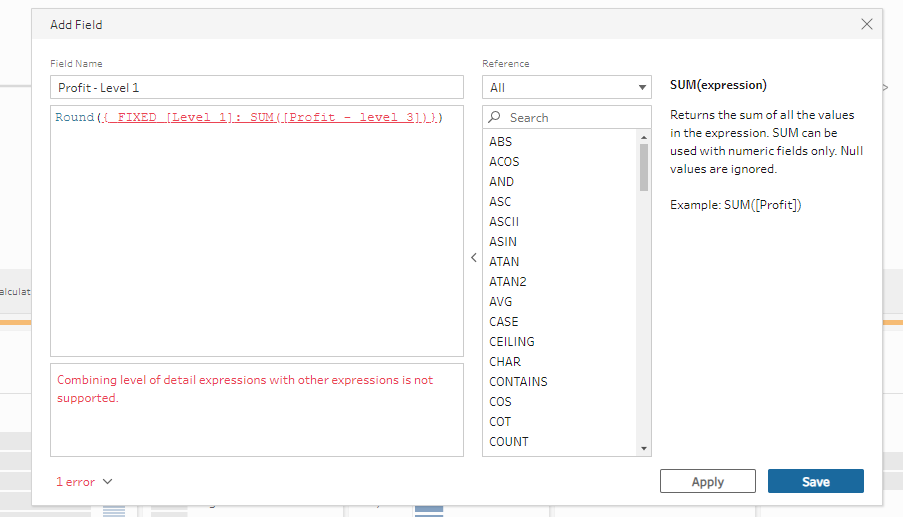
This is the usual way to create a new calculated field in Tableau Prep. Click on the Create Calculated Field button (see #1 below) and write your calculation following the Fixed LOD syntax as you would in Tableau Desktop.
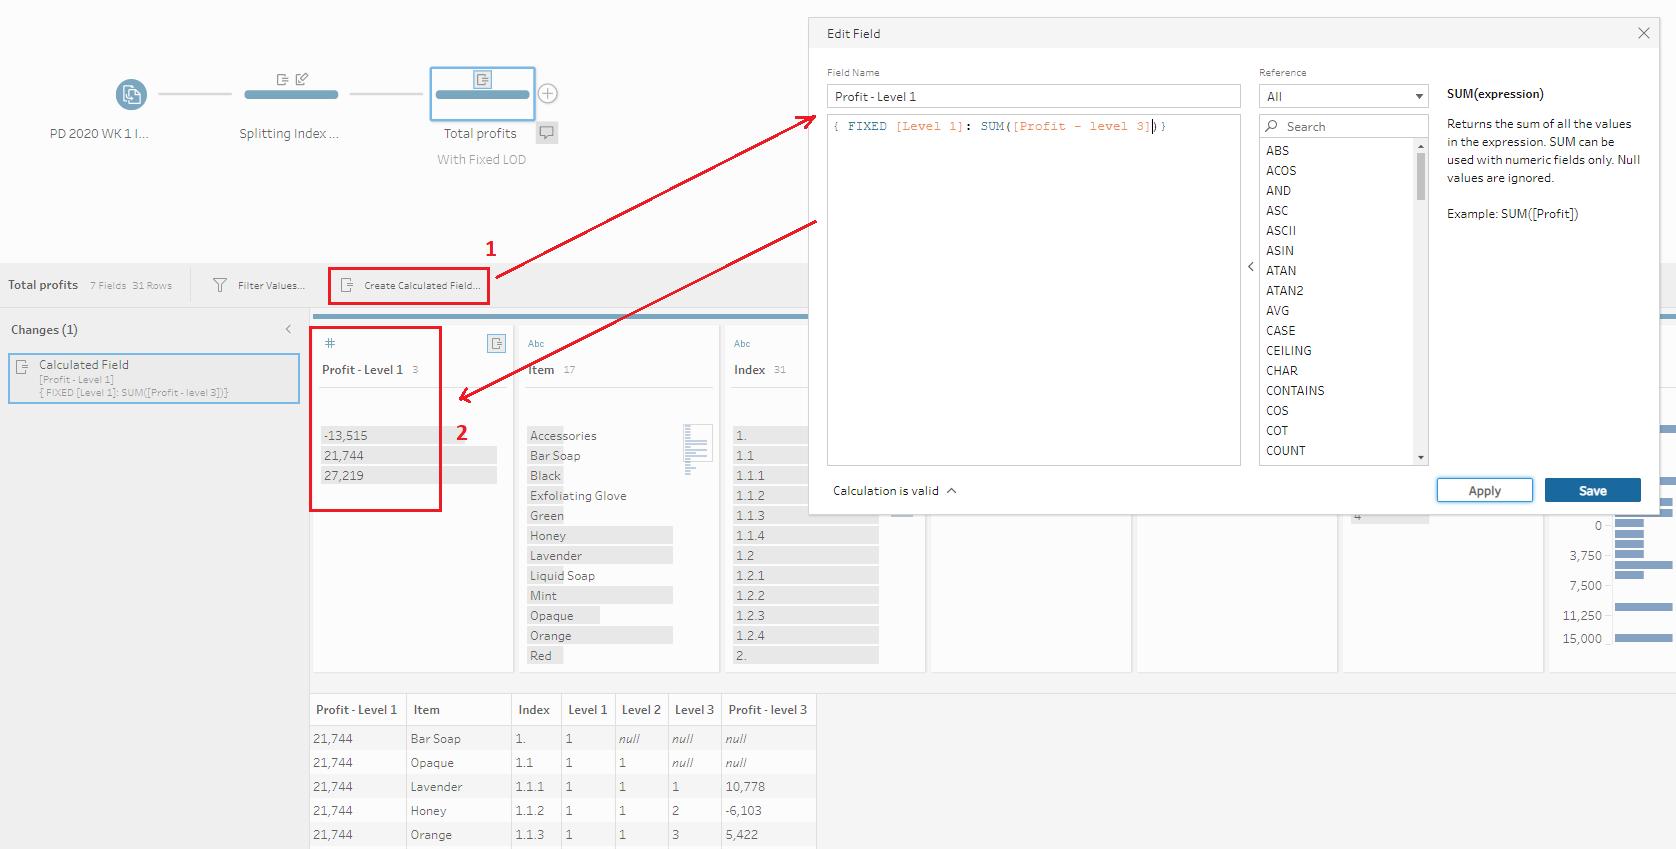
Writing a Fixed LOD calculation
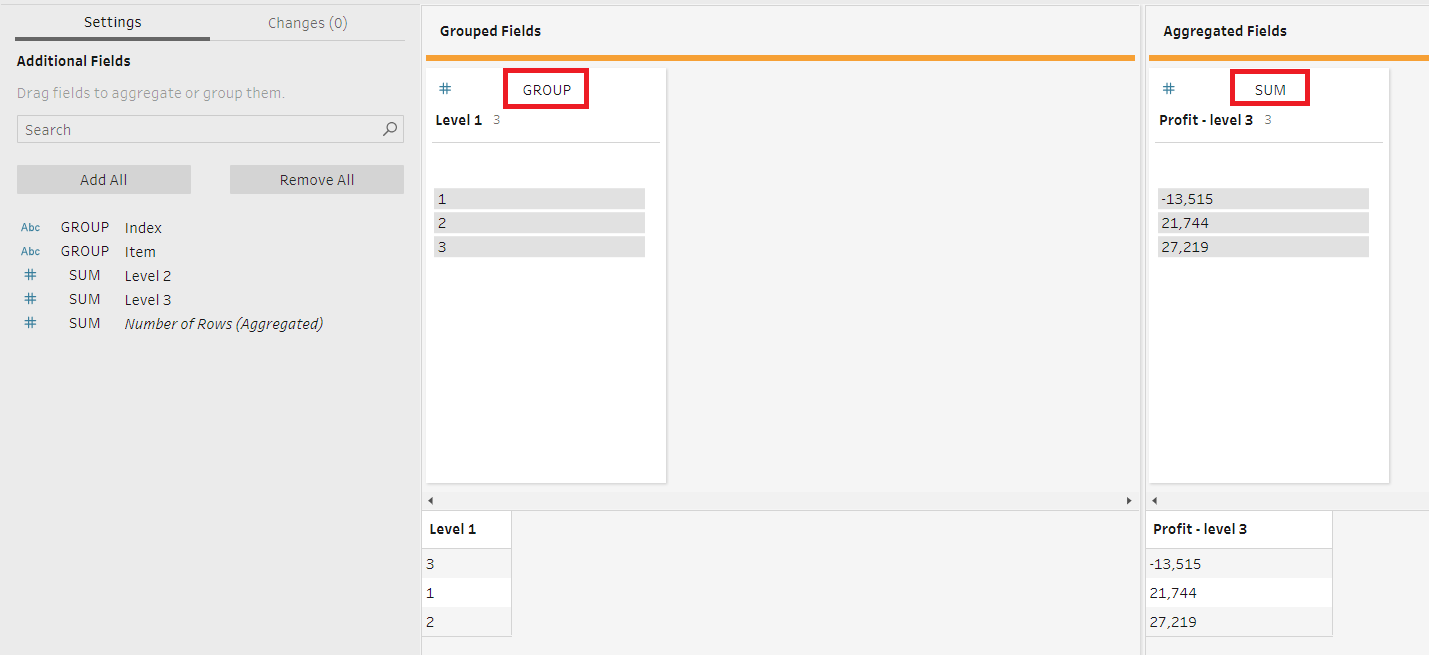
The most granular level of data in this dataset is Level 3. So, similar to using the Aggregate step in the previous version of Tableau Prep Builder, here we need to find the sum of profits for Level 3, and group it by Level 1. However, instead of actually using the Aggregate step, we just create a calculated field called Profit - Level 1:
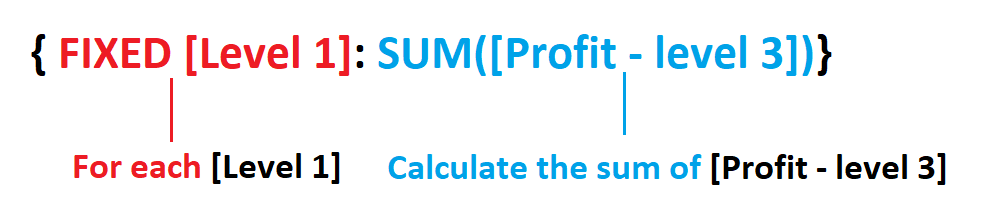
Fixed LOD expression syntax
Remember to wrap your LOD calculation in curly brackets!
2. Create a Fixed LOD calculation using the visual calculations window
If you don’t have much experience with them, writing LOD expressions directly can be daunting. Which fields do you need to aggregate by? How do you know that your calculation is working?
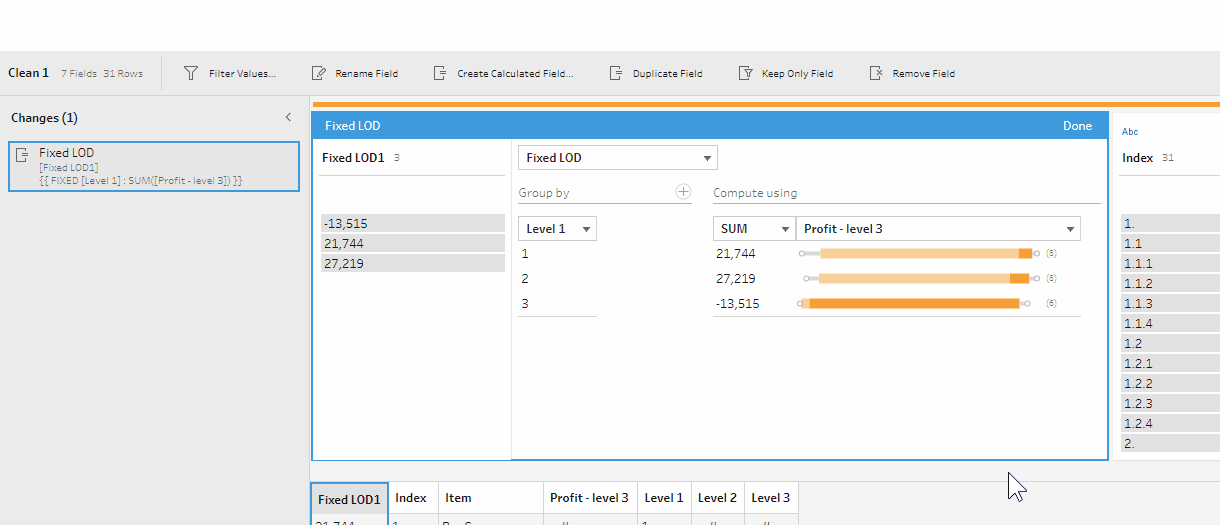
Tableau Prep Builder 2020.1 introduces a visual calculations window that makes writing LOD calculations a breeze. This feature strengthens Tableau Prep’s mission to make data preparation easier and more transparent, especially for users with limited experience. The visual calculations window allows you not only to see how your data changes depending on the selected aggregation, but also serves as another way to explore your data while creating calculations.
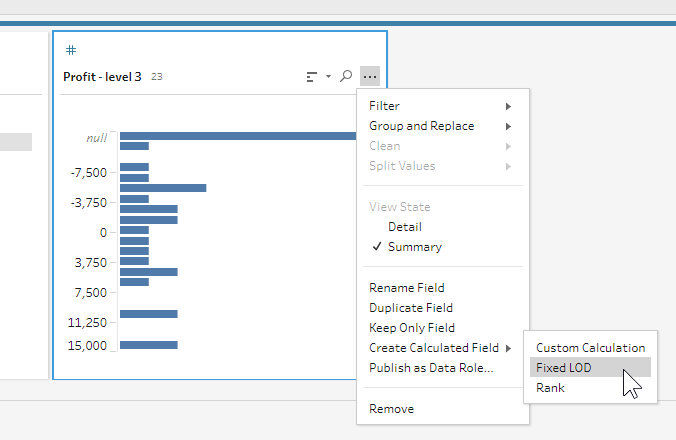
To bring out the visual calculations window, click on the three dots icon in any field’s header, and select Create Calculated Field > Fixed LOD. If you know which field you need to aggregate, call the visual calculations window from this field’s header (in our case it’s the Profit - level 3 field). Don’t worry if you decide to use another field later, you can always change it.
Bringing out the visual calculation window
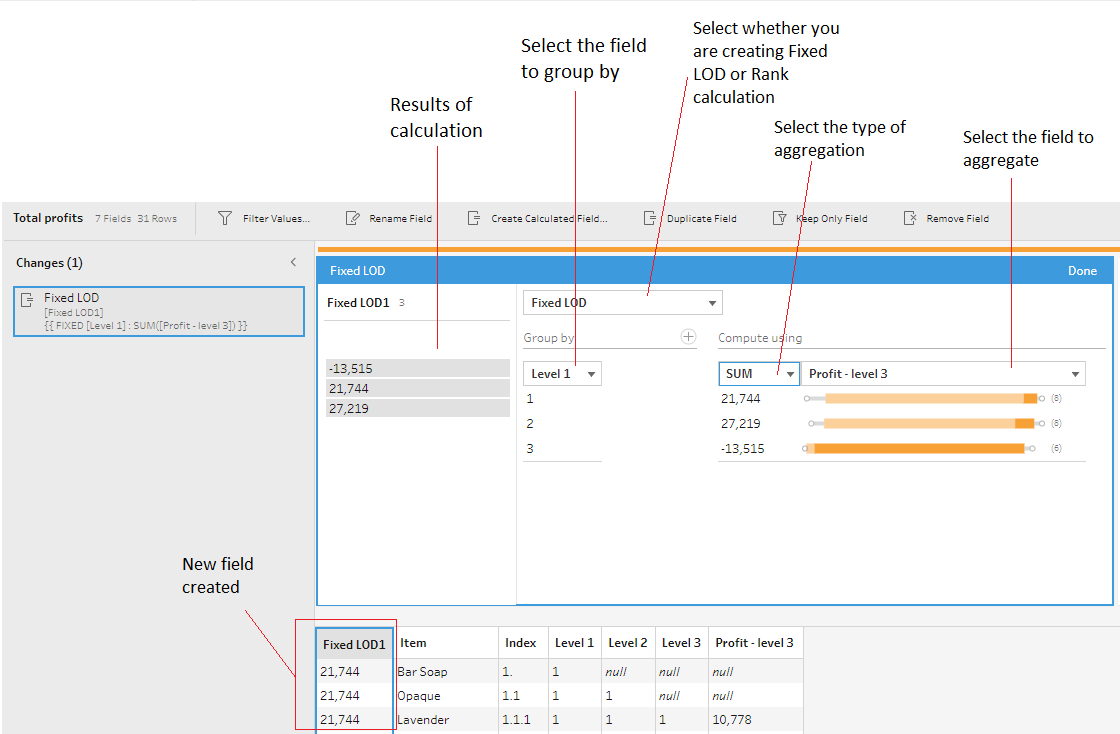
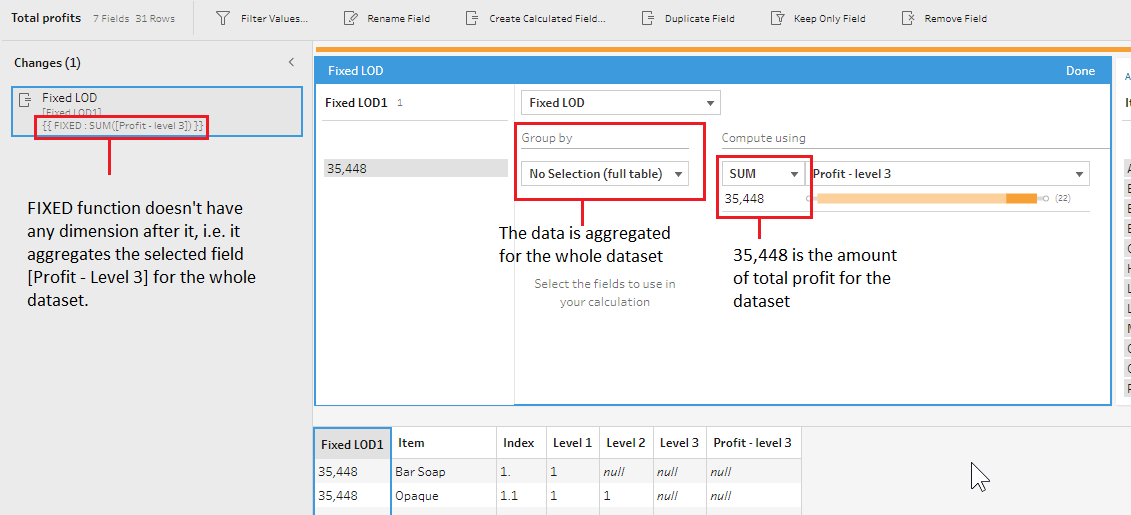
Now, instead of writing a calculation, we can pick and choose our dimensions, measures, type of aggregation, and see how the data changes. The image below highlights the main features of the visual calculations window.
Creating Fixed LOD calculation using the visual calculation window
Now let’s see this new feature in action!
I really like how this window lets you see how the values dynamically update as you change the calculation. Moreover, it’s also a great tool to explore your data without leaving the calculation window. For example, you can click on one of the new values on the left in the window and highlight them in the data preview pane below.
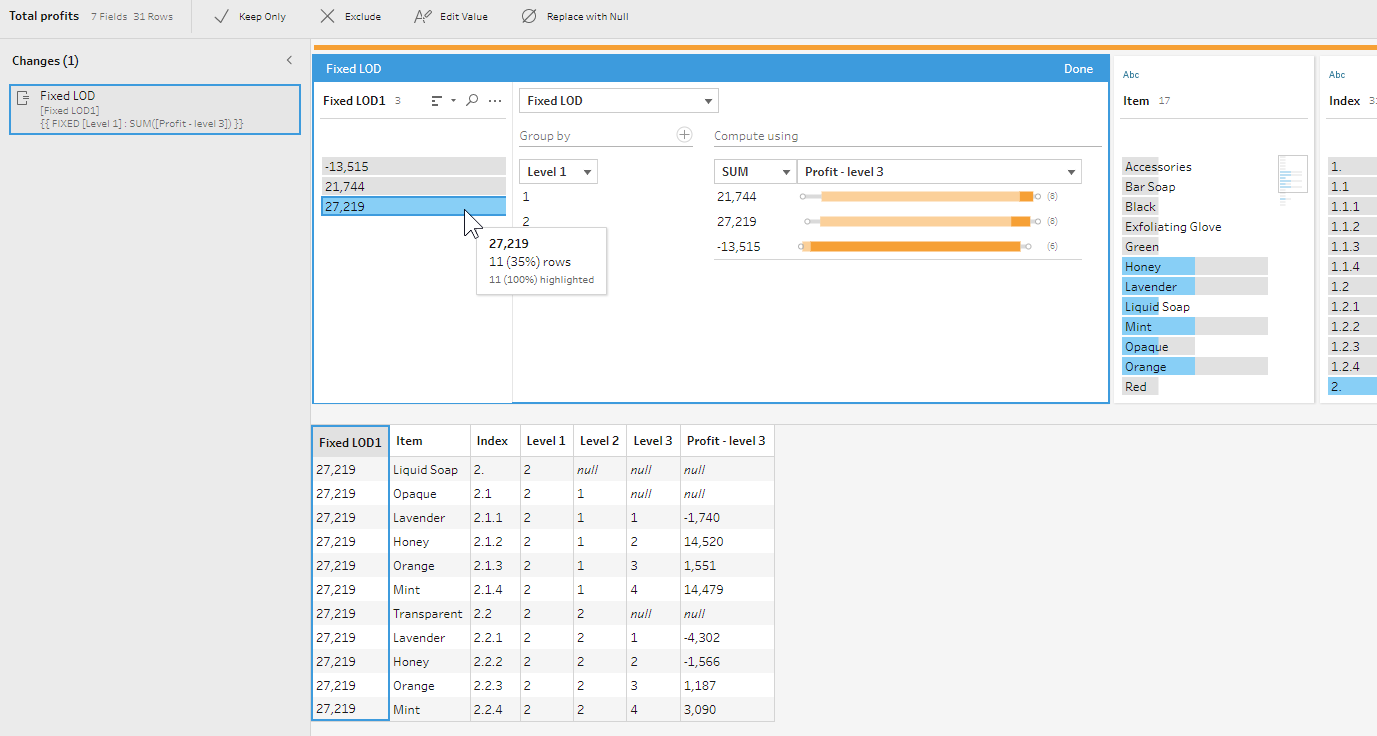
You can also see the distribution of values from the box plots for each calculated value on the right side of the window, as well as to see how many non-null values there are in each group.
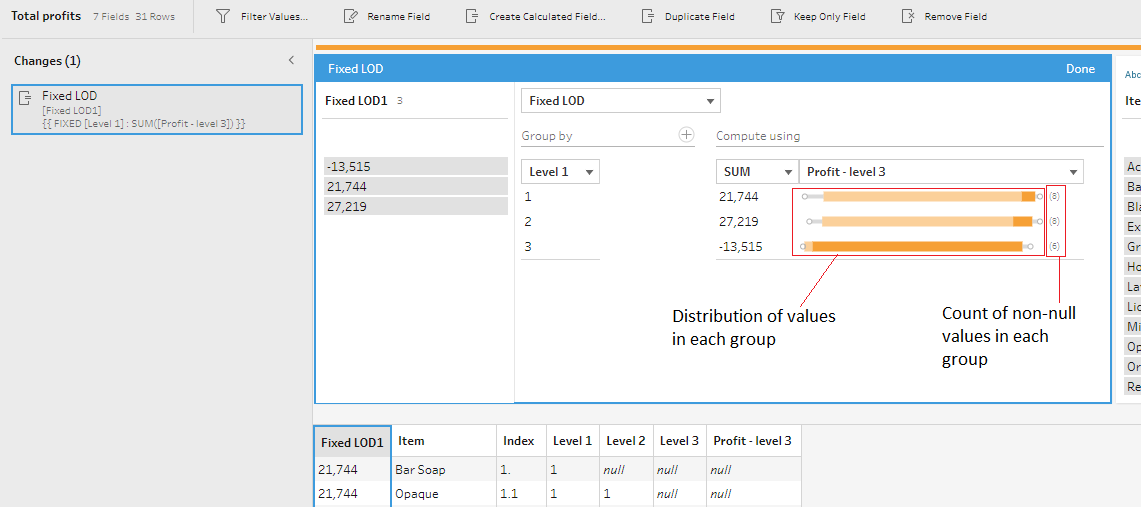
You can also interact with this window to quickly change the selected aggregation. For example if you click on one of the circles on the ends of box plots, i.e. indicators of max and min values, the aggregation will change to MAX or MIN accordingly.

To change the aggregation to COUNT, just click on the non-null values indicator next to a group.
Notice how the syntax of the calculation in the Changes pane on the left updates when you change the aggregation or fields in the calculation window. This can be a really helpful learning tool for people who are not familiar with LOD expressions and their syntax.
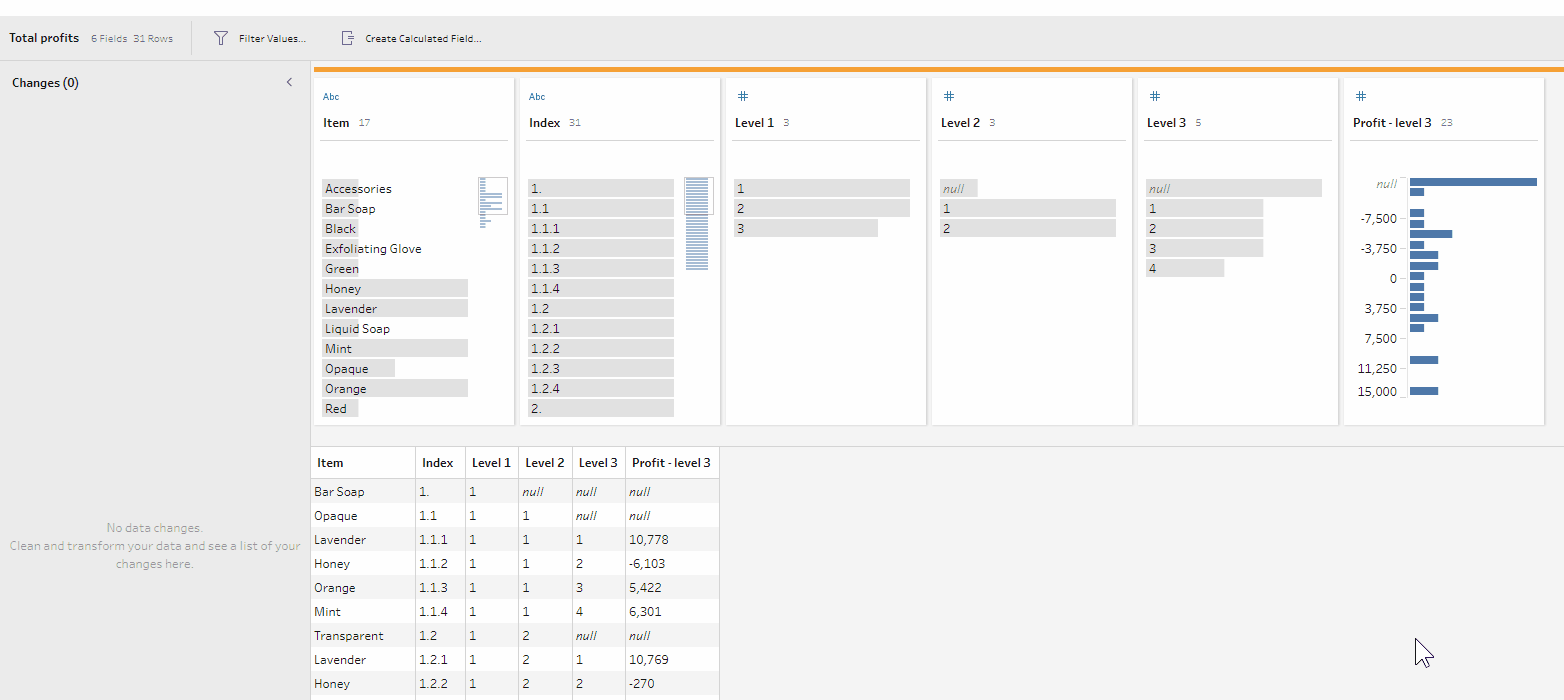
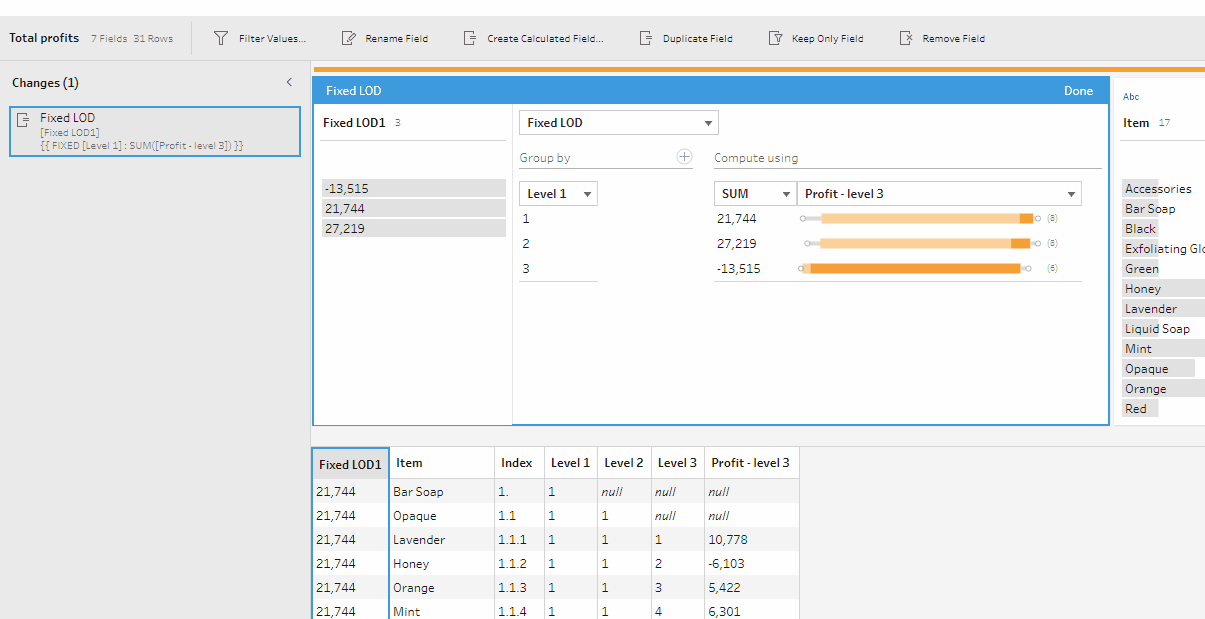
Similar to Tableau Desktop, you can create a Fixed LOD calculation for the whole dataset. If, for example, we want to find the total profit for all products sold, we can remove the Level 1 field by right-clicking on it and selecting Remove Field option:
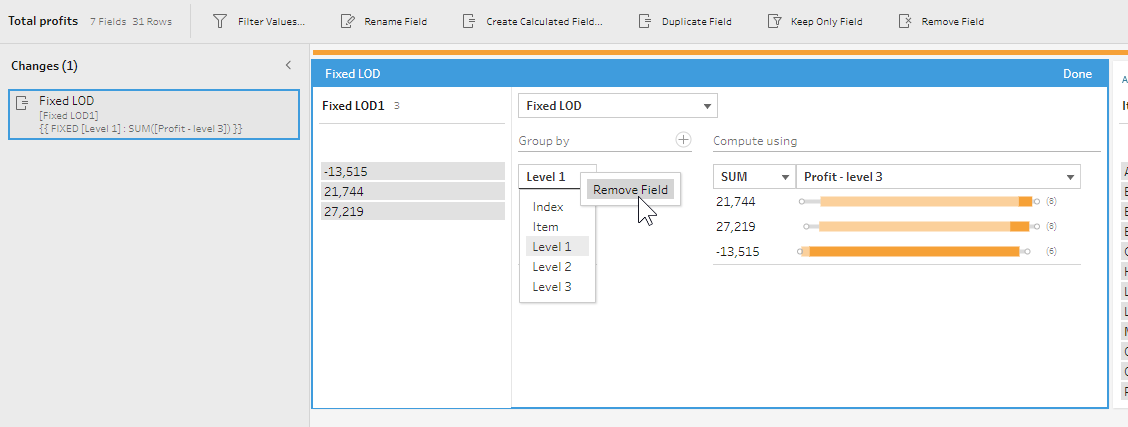
Now the field Profit - Level 3 is aggregated for the whole table, and the Fixed LOD calculation doesn’t have any field after the FIXED expression:
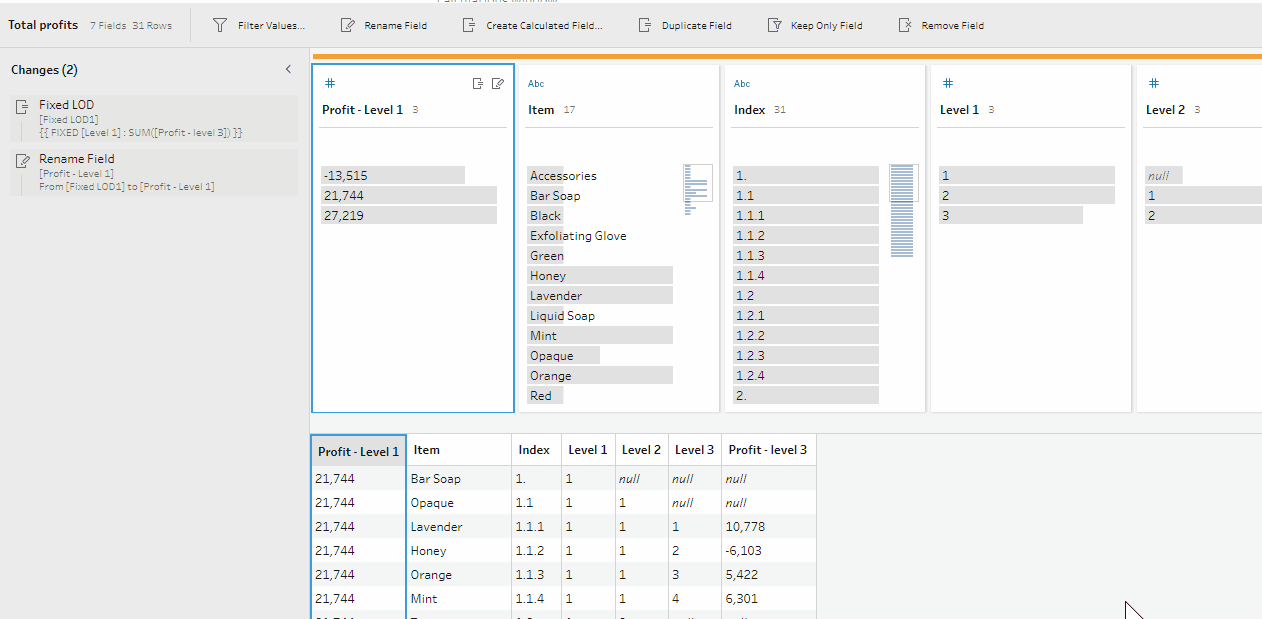
Let’s group this expression by the Level 1 field again, and rename the new field Fixed LOD1 as Profit - Level 1.
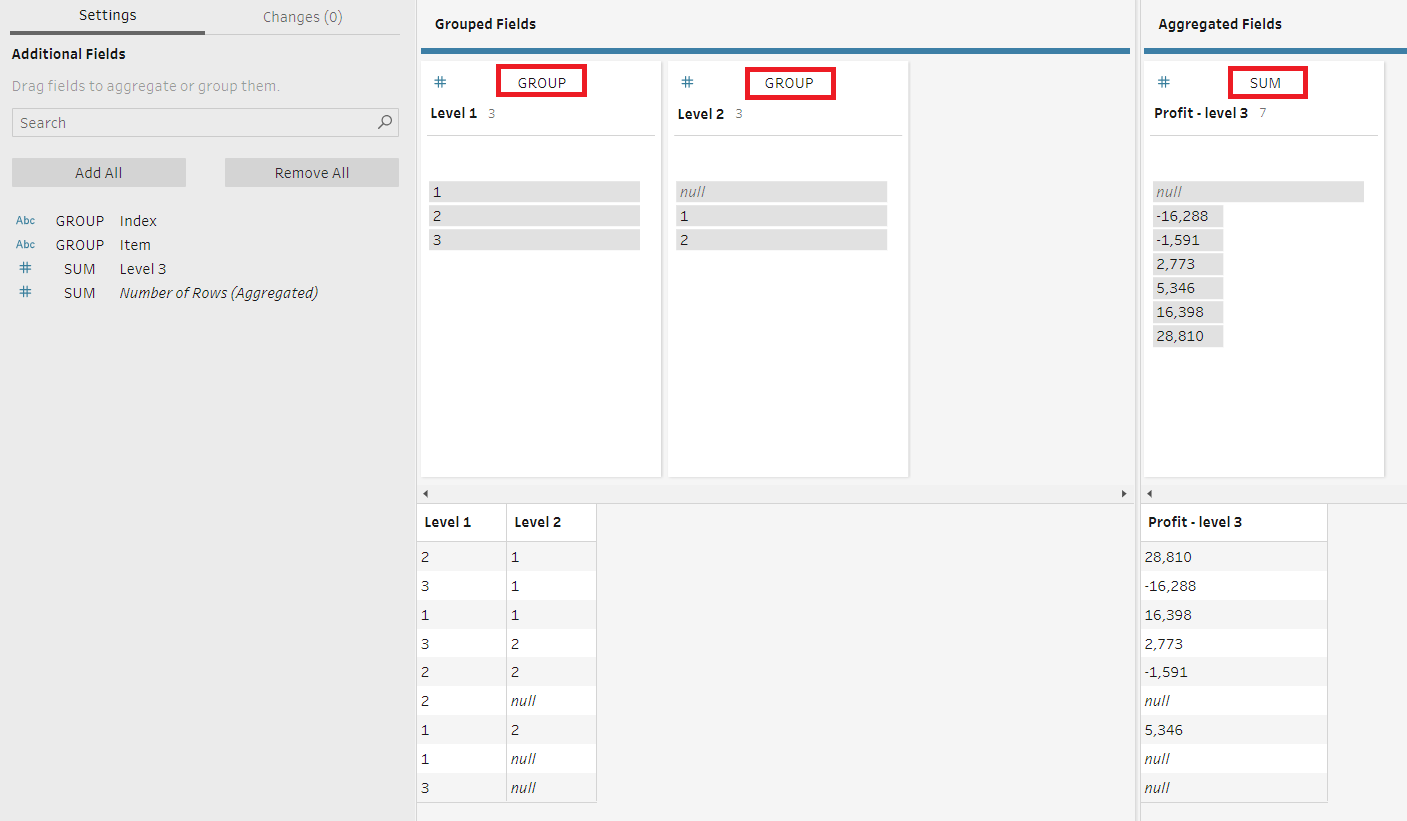
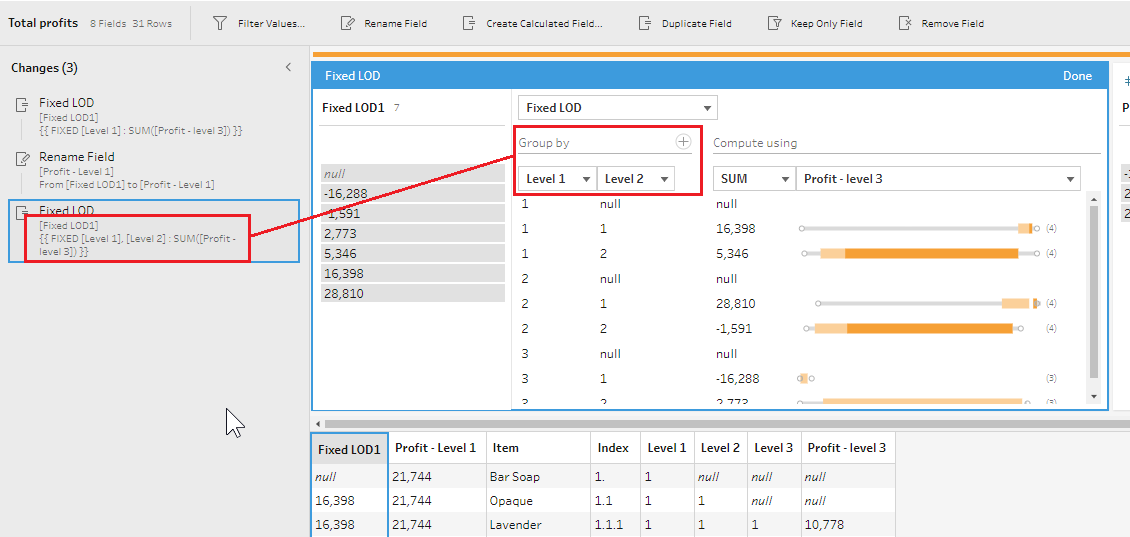
You can also use the Fixed LODs to group your data by two fields at the same time. Let’s look at how we can do this to calculate the profit for Level 2 in this challenge. This is how the original Aggregate step was configured in my initial solution for this challenge:
Calculating profit for Level 2
As you can see, here, the profit was grouped by both Level 1 and Level 2 fields to calculate the profit for Level 2. Now let’s replicate this logic with a LOD calculation. To group by two fields in the visual calculations window, select the first field to group by, then click on the plus sign next to the Group by header, and select the second field you need to group by.
Creating a Fixed LOD expression when grouping by more than 1 field
Notice that the syntax of such calculation also changed, and now the FIXED function has two dimensions next to it, separated by a comma.
Creating a Fixed LOD expression when grouping by more than 1 field
To complete the challenge, we just need to recreate a couple of calculations from the original solution to format the profit statement. Our final flow with Fixed LOD calculations now looks much smaller than the original one without them. If we want to, we can now compress the solution into one Cleaning step, but it’s a good idea to split your workflow in logical steps so it’s easier to understand and debug, if needed.
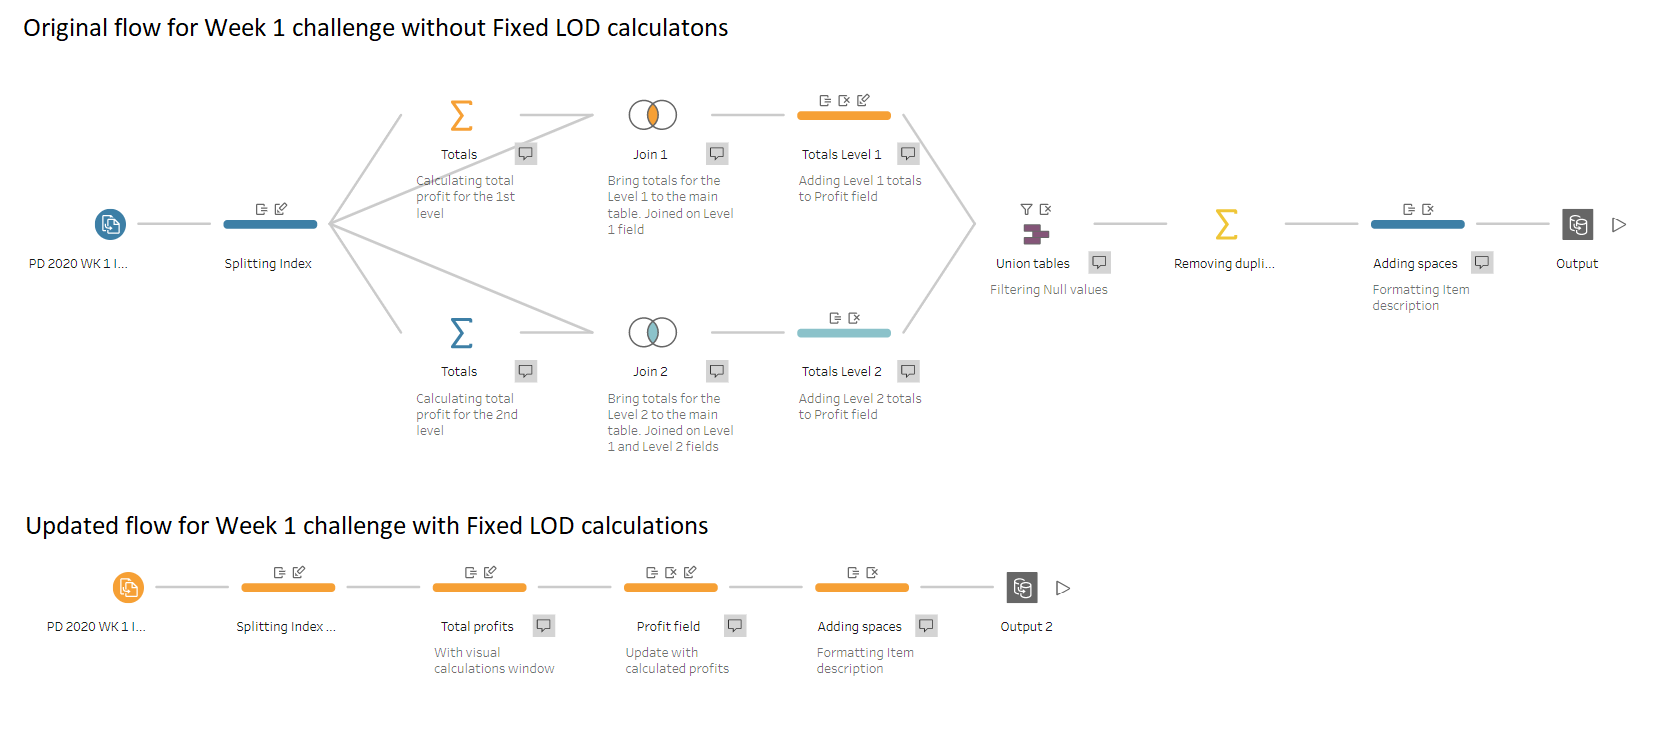
Flows for Week 1 challenge: without and with Fixed LOD calculations
Potential improvements to LOD expressions in Tableau Prep Builder
After exploring Fixed LOD expressions in Tableau Prep Builder’s recently released 2020.1 version, I think there is still some room for improvement:
- At the moment the fields that reference Fixed LOD calculations cannot be deleted. When I try to delete them, the whole table disappears as some calculations can’t find the referenced Fixed LOD calculations. For example, in this challenge I created the Profit - Level 1 and Profit - Level 2 fields using Fixed LOD expressions. These fields are then used to create the Profit field. As I don’t need them further in my analysis, I tried to delete them, but then the entire table disappeared. The ability to delete unused fields would make working with large datasets easier and more efficient. Currently it is possible to delete a field that is not needed, even if it’s referenced in another calculation, but somehow this doesn’t apply to Fixed LOD expressions.
Trying to delete Fixed LOD calculations that are referenced in other calculations
- It would be great to be able to write LOD expressions directly in calculations. At the moment, you should first create them as a separate calculated field, and then refer to this field when you need to use in a new calculation. At the moment it’s also impossible to create nested LODs, but that can be solved by creating two separate calculations, and then combining them together into a third calculation.
-
I noticed that if the LOD calculation was originally created using the visual calculations window then, if you need to edit it, you are only able to do so in the visual calculations window. However, if you wrote the calculation manually using the usual Create Calculated field option, then you won’t be able to edit it using the visual calculations window. It might be a good idea to make this behaviour consistent, or make the option to create Fixed LOD expressions more prominent to encourage its usage.
-
It is possible now to rename a Fixed LOD calculation directly in the visual calculations window by double clicking on the field’s name. However, the process is not very smooth. Once you rename the field, the dialogue window closes without giving you the option to finish configuring the calculation, so you need to reopen the dialogue to edit it (see an example of this behaviour below). The same situation occurs if you try to create a calculation that uses the Fixed LOD calculation that you are working on directly from the visual calculations window. The process of working on the Fixed LOD would be much smoother if the visual calculations window could remain open until the Done button is pressed.
Trying to rename a Fixed LOD calculation
Ultimately, it’s great to finally have Fixed LODs in Tableau Prep. Not only is it a powerful, time-saving functionality, but the new visual calculations window is a feature that I hope will be ported to Tableau Desktop because it greatly helps to understand how a calculation is computed.
You can download the completed flow for this post from my GitHub repository.
Let me know if you have any questions.